





Zigbee, MQTT and Zigbee2MQTT: How I Run My Home’s Smart Switches
 Written byMohamed Slimani
- CategoryIoT
- Date
- Reading5 min
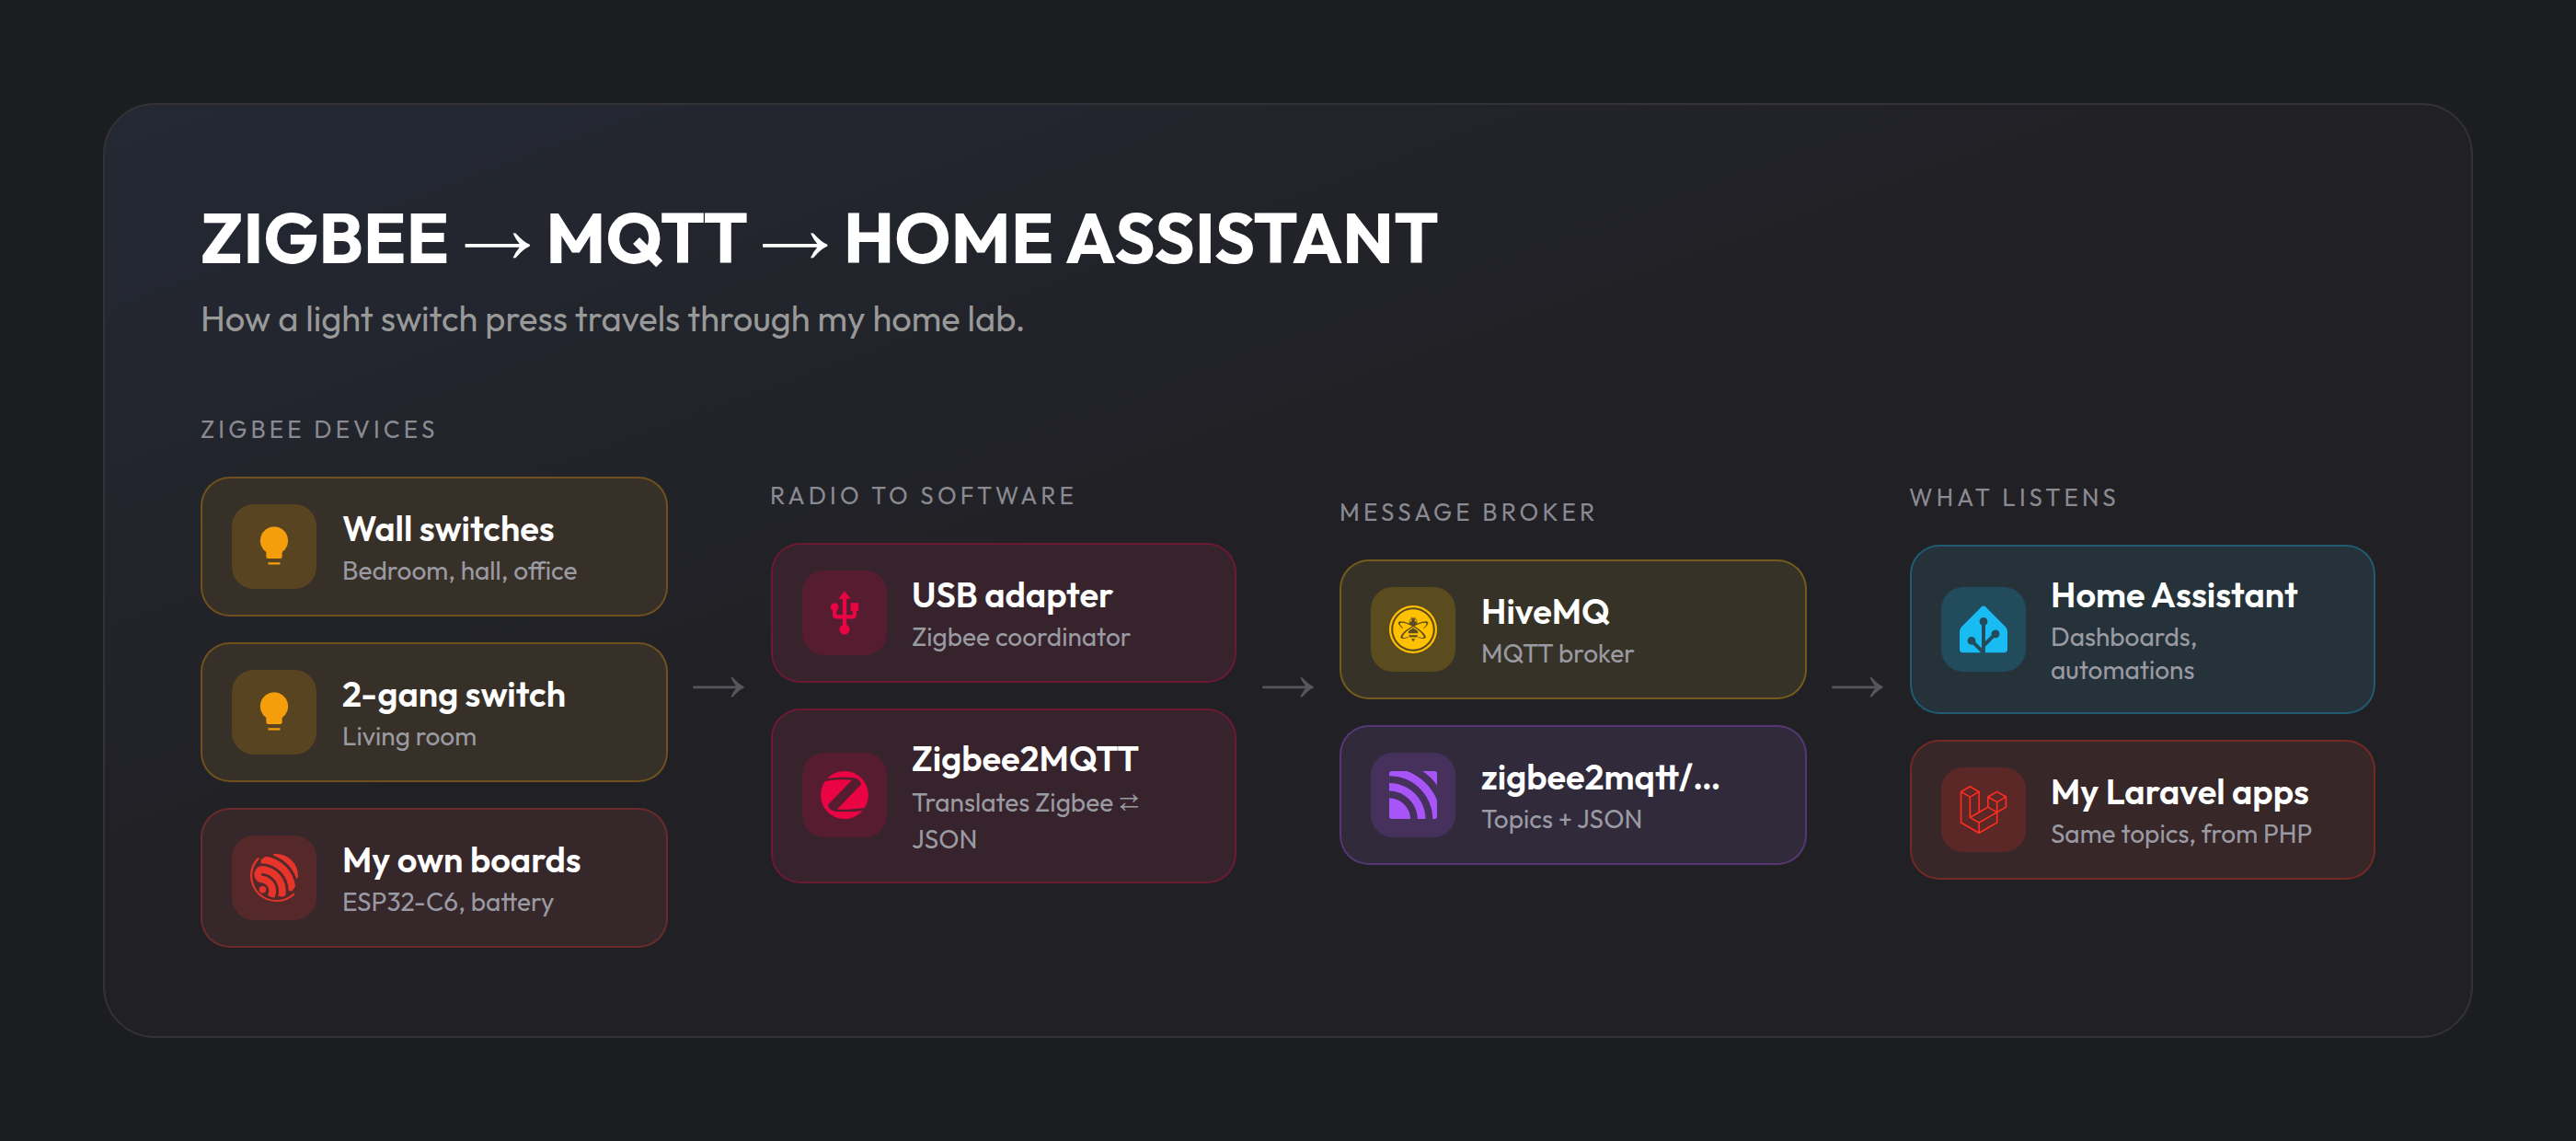
The lights in my home are switched by Zigbee wall switches, and none of them talks to a vendor's cloud. Every press goes through a USB radio stick, Zigbee2MQTT and an MQTT broker on my home server, and from there to Home Assistant. The same setup also serves as my test bench when I build Zigbee devices of my own. Here is how the pieces fit together and why I like this way of doing smart home.
The three pieces
Zigbee: the radio
Zigbee is a low-power wireless protocol made for small devices: switches, sensors, plugs, bulbs. It does not use your Wi-Fi. Devices form their own mesh network: mains-powered devices usually act as routers and pass messages along, while battery devices sleep most of the time and wake up only to send or receive. That is why a Zigbee sensor can run for a long time on a small battery, and why adding more mains-powered devices tends to make the whole network stronger.
MQTT: the post office
MQTT is a lightweight publish/subscribe protocol. Programs connect to a broker, publish messages on named topics (like zigbee2mqtt/Hall Light), and subscribe to the topics they care about. The sender does not need to know who is listening. I run HiveMQ as my broker.
Zigbee2MQTT: the translator
Zigbee2MQTT (Z2M) sits between the two. It drives a USB Zigbee adapter (the coordinator of the network), and turns every Zigbee message into JSON on an MQTT topic, and every MQTT command back into Zigbee. It supports thousands of devices from many brands, so one cheap USB stick replaces a drawer full of vendor hubs and apps.
My setup
Everything runs in one Docker stack on my home server:
- Zigbee2MQTT, with the USB adapter passed into the container.
- HiveMQ, the MQTT broker.
- Home Assistant, for dashboards, the phone app and automations.
It all stays on my local network. The switches keep working even when the internet is down, and no company decides one day to shut down the cloud my lights depend on.
The devices
Today the network has Zigbee wall switches in the bedroom, the hall and the office, and a two-gang switch for the living room lights. They replaced ordinary switches, so they still work like normal switches on the wall, but they can also be controlled from my phone and from automations.
One setting I recommend on every switch: power-on behaviour = previous. After a power cut, each light comes back in the state it was in, instead of every light in the house turning on at 3 a.m.
What the messages look like
When a switch changes, Zigbee2MQTT publishes its state on its own topic. Clear, human names make everything easier, so the topic is the device's friendly name:
zigbee2mqtt/Hall Light
{"state": "OFF", "power_on_behavior": "previous", "linkquality": 204}
To switch it, any program publishes to the /set topic:
zigbee2mqtt/Hall Light/set
{"state": "ON"}
The two-gang switch has one state per gang, state_l1 and state_l2. And linkquality tells you how good the radio link is, which helps when you decide where the next router device should go.
This is what I love about MQTT: Home Assistant is just one listener. A script, a dashboard or one of my own applications can read and control the same devices by speaking JSON on topics, with no special SDK.
Home Assistant on top
Zigbee2MQTT can announce every device to Home Assistant automatically through MQTT discovery, so a newly paired switch shows up in Home Assistant with its controls, ready for dashboards and automations, without writing any configuration by hand.
A test bench for my own Zigbee devices
I also design Zigbee hardware: battery-powered boards built on the ESP32-C6, with my own firmware. My home network is where they are paired and tested first, next to the light switches.
A few things I learned building them:
- External converters. Zigbee2MQTT does not know a brand-new device. A small JavaScript converter file tells it which endpoints the device has (a light, a buzzer, a display) and how to read custom attributes, such as a serial number stored in a private cluster. Drop it in Z2M's data folder, restart, and the device gets proper controls.
- Sleepy devices miss commands. A battery device that is asleep can miss a message. Instead of trusting the last state I sent, my code asks the device for its real state with the
/gettopic when it matters. - The backend is just another MQTT client. A Laravel app subscribes to
zigbee2mqtt/#with a long-running artisan command, stores what devices report (battery, state, link quality) and publishes commands on/set. No Home Assistant needed when the devices belong to an application rather than a home.
Tips if you want to start
- Start with a good USB coordinator and put it on a short USB extension cable, away from the server and USB 3 ports, which can interfere with 2.4 GHz radio.
- Add mains-powered devices first: they build the mesh that battery devices rely on.
- Name devices well when you pair them. The name becomes the MQTT topic and the entity in Home Assistant.
- Back up the Zigbee2MQTT data folder. It holds the network's settings; lose it and you have to pair every device again.
- Keep the broker on your local network and protect it with credentials. Anyone who can publish to it can switch your lights.
Zigbee, MQTT and Zigbee2MQTT turned my home into something I fully own and understand, and they gave me a simple, open way to connect real hardware to the web applications I build. If you are working on a product that needs to talk to devices, let's talk.
Tags :
- Zigbee
- MQTT
- Zigbee2MQTT
- Home Assistant
- Home lab
- IoT